April marks the opening of the Micro-Entreprise social charges (cotisations sociales) declaration period for the first quarter of 2021.
Something that will eventually become second nature might at first seem quite daunting. The language barrier, as well as the idiosyncrasies of the online process, might have you wondering how on earth you will ever manage. So here is a step-by-step guide to help you through your first (quarterly) declaration.
If you set up your Micro-Entreprise at the end of 2020 and have not yet done your first social charges declaration, this blog is for you!
REFRESHER: The social charges are a portion of your turnover you must pay to the government (URSSAF) contributing to your health coverage, retirement, professional training and other social benefits. You will pay a fixed percentage based on your business type (artisan, commercial etc…). You MUST declare your business income every month or quarter (you choose), even if your income is nil. You only pay when you have earned revenue/turnover for that period.
Step 1: Create an URSSAF account
The account creation process is quite straightforward, but there is a big catch right from the get-go. You must enter a social security number to create your account. If, like me and thousands of others, you did not have a Carte Vitale before creating your ME, you will likely be using a temporary social security number to do this.
If you are in this situation, you can try two options:
- Use the number provided on your Notification d’Affiliation (a document sent to you by URSSAF a few weeks after your business registration is complete).
- Despite requiring all micro-entrepreneurs to make their declarations online, most regional URSSAFs are still sending out the old-school blue declaration forms a few months after your business registration. If you have received one of these, you can check the upper left-hand corner for another “numéro de sécurité sociale” and try using that.
Note that neither of these numbers are generally your real temporary social security number. Only CPAM can provide you with this once you have made your application into the health-system and sent in your birth certificate and other identity documents.
If you already have your Carte Vitale or an official temporary number issued by CPAM (numéro provisoire) then you should have no issue creating your account.
Follow these steps:
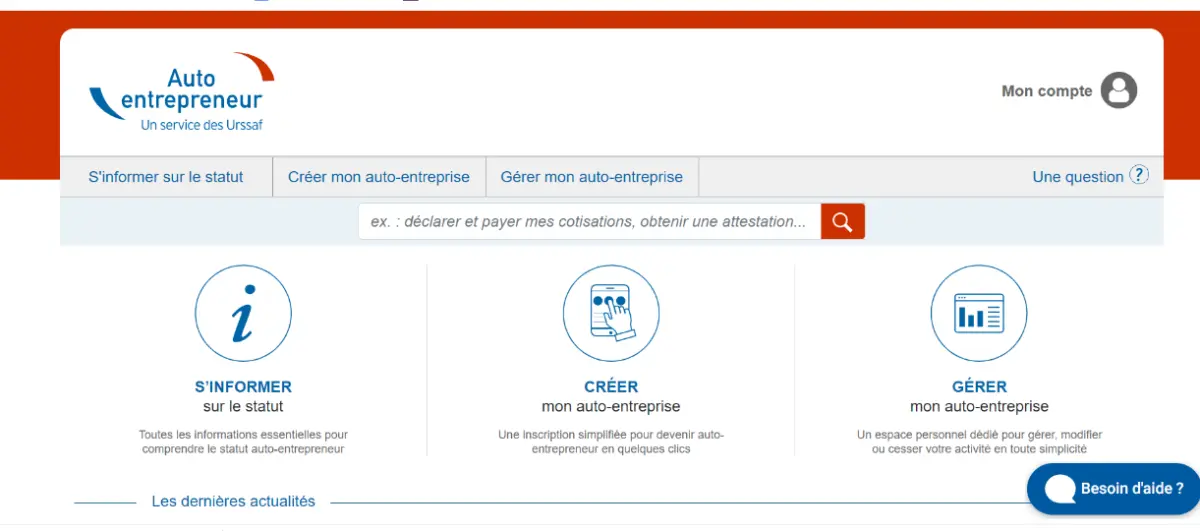
- Head to www.autoentrepreneur.urssaf.fr
- In the top right corner of the page click on “Mon Compte” (my account)
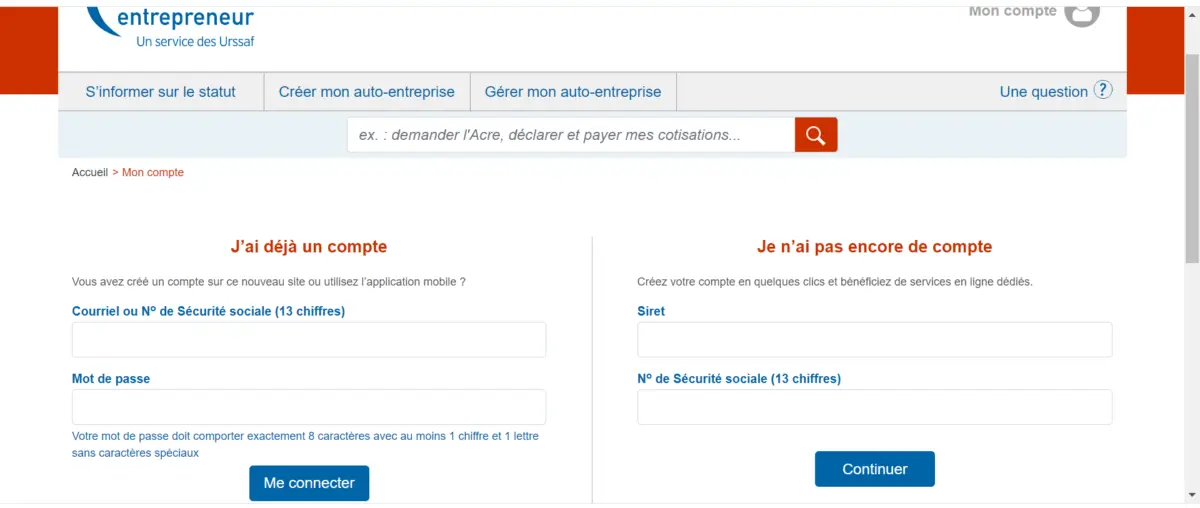
- On the next page, fill in your SIRET number and your social security number in the right-hand column “Je n’ai pas encore de compte” = “I do not yet have an account”
- Click “continuer”. Then fill in the rest of the information (name, date of birth, phone number, email address etc).
- You will then receive an email in your inbox with your account details and a password. Log in to your account (this time using the left-hand side “J’ai déjà un compte” as above). Once logged in, you can then change your password to something more personal.
Et voilà! You’re in!
Step 2: Making the declaration
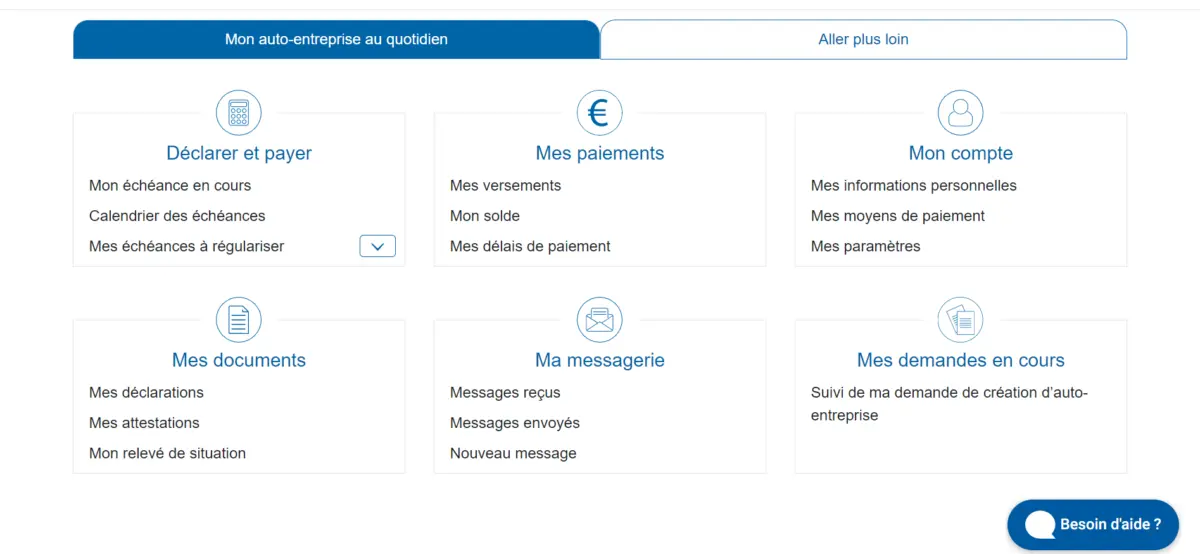
On your account dashboard, you will find all the different sections to: make your declarations and payments, manage your payment methods, check when your next declaration is due, message URSSAF directly, download documents etc… When it’s up and running, (the website seems to go offline at regular intervals but is usually back up within a day or two) this is a very simple and efficient tool.
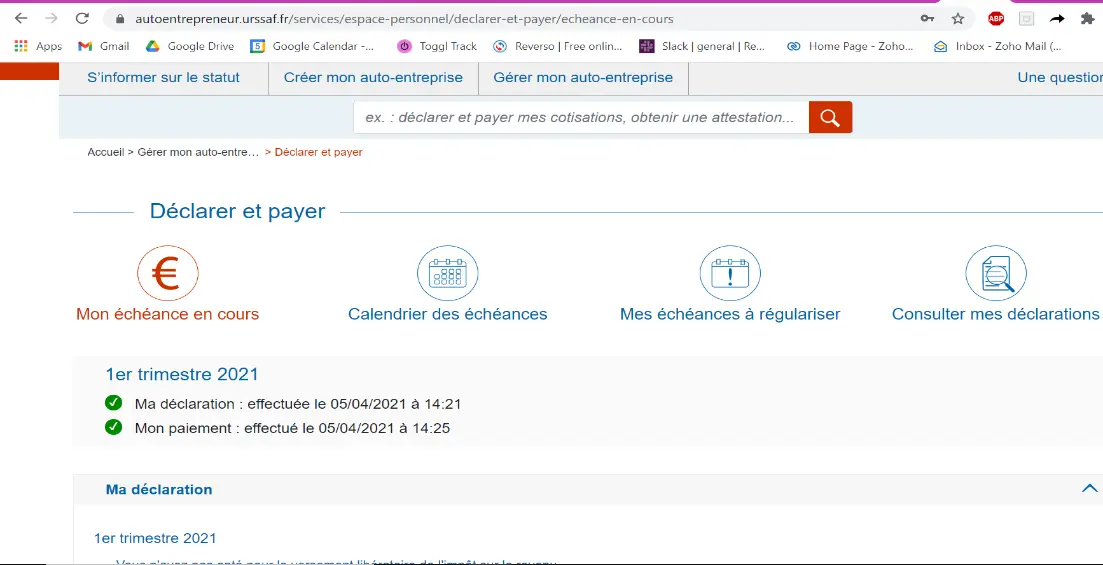
- To make your declaration, in the first section on the left, click on “Mon échéance en cours”.
PRO-TIP: If you get a message saying you are “hors période déclarative”, this means you are outside the declaration period and need to wait for it to open. The declaration periods are the beginning of April, July, October and January for quarterly. The monthly declaration period is open every month after the first 90 days of your activity.
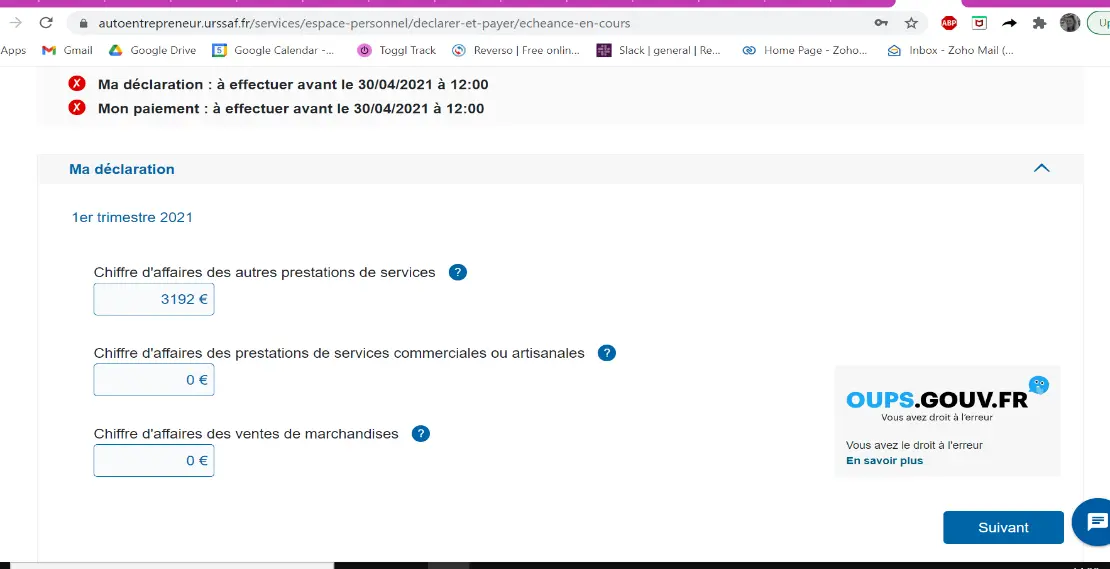
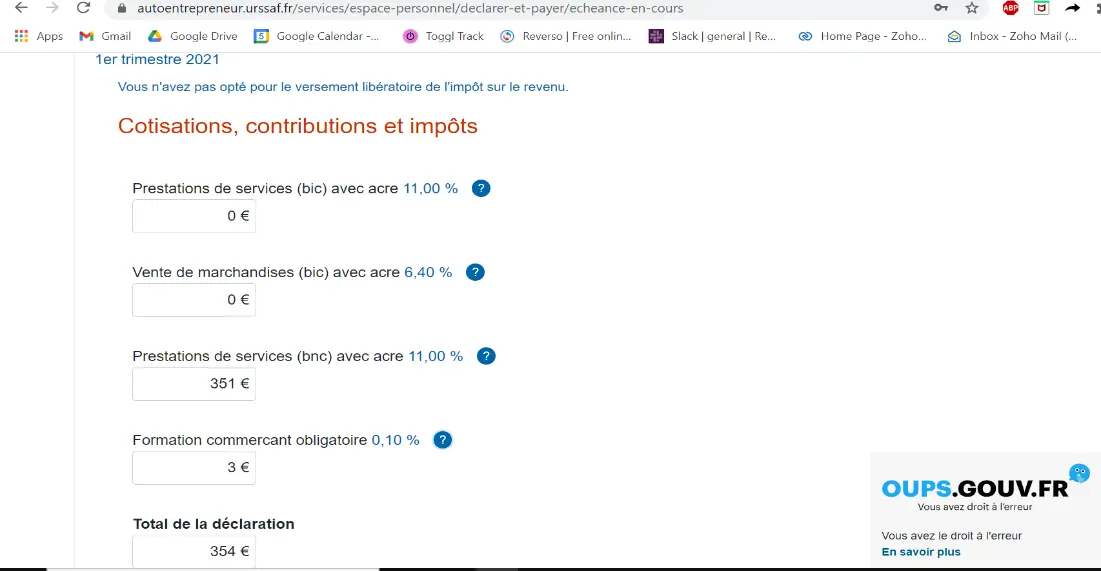
- You will see three different revenue options. Your choice will depend on what type of business you have registered and how your ME was set up (e.g. Profession libérale, commercial, etc.), so you may need your registration paperwork to hand for your first declaration. Add up the turnover for each month since the beginning of your activity and enter the rounded amount (no centimes) in the relevant box.
N.B: if you are a quarterly declarer, you will be adding up three months of turnover every time you declare after your first time. The first declaration can include more than three months, depending on when you started your activity. For monthly declarers, your first declaration will be three months’ worth, then only your previous month’s turnover after that.
PRO-TIP: If you have a mixed activity, e.g selling items and providing admin services, make sure you separate the turnover from each activity and enter them into the corresponding box as the calculation is different for each activity.
- Click “suivant”. Your social charges will be automatically calculated, and the amount due will show in the section ‘Total de la declaration’ and ‘total à payer’.
PRO-TIP: You will notice there is also a small charge (0.10%) for ‘formation professionnelle’. This money goes into your professional training pot in case you want to undertake any training after your first year of business.
- Click “valider” to register your declaration. You will get a pop-up message asking you to confirm you want to register it and stating you can change the declaration up until the last day of the month.
Step 3: Paying the social charges.
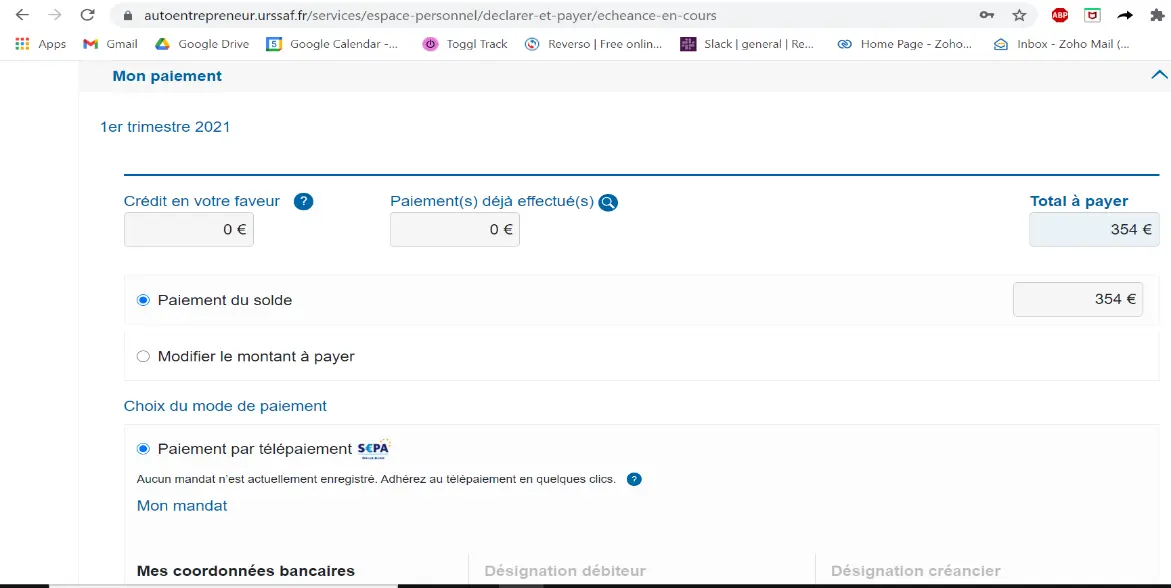
You can make a payment straight away, carrying on from the declaration you’ve just made. You can also come back and pay later by returning to the “Mon échéance en cours” tab and scrolling down to the payment section.
- Choose between paying the whole amount straight away “paiement du solde” or paying part of it now and the rest later by clicking “modifier le montant à payer” and entering the amount you wish to pay for this installment.
- You have two options for paying, make sure you tick the one you want:
- Setting up a direct debit – “paiement par télépaiement SEPA” – enter your bank account details, download the payment mandate, sign it and send to your bank or
- Pay by card directly – this takes you to a separate, secure payment page where you enter your card details etc.
Et voilà! Simple comme bonjour! 😊 Once you’ve paid, you can download a receipt. When the declaration period is closed, you will be able to download a “justificatif” that will recap your declaration and payment from the “Mes documents” tab.
When you return to the “échéance en cours” tab, you will also see a little green tick next to your declaration and payment (if you’ve made it) as well as the date and time at which you carried it out. Very handy for those of us who tend to forget these things 😉
As usual, don’t hesitate to contact me or any member of the Renestance team if you have any issues or questions and would like to employ our services to help you. Happy declaring!
Harriet is a British born, French raised, European who loves resolving problems and knowing when she's helped out. Her energy and positivity are a great fit with the rest of the Renestance Team and a treat for customers!
All articles by: Harriet Amazon-Brown



Danish Pannu
on 2024-01-11 at 22:14Hello Harriet,
Thanks for this informative article.
I have a question:
I get paid for my services the month after I provide them. So, do I add the amount that I invoiced in December but received in January in my quarterly declaration (of the 4th quater)?
Thanks in advance for your help.
Regards,
Danish